

Decorating A Cake With Sprinkles
Home / Recipes / How to Decorate a Rainbow Sprinkle Funfetti Cake
Jump to Recipe
Taste the rainbow.
Some might say that, technically, rainbow sprinkles do not have much taste or flavor. But to me? They taste like something close to joy. And who doesn't need a little fun and joy? Here's your pastry pro's step-by-step guide to how to decorate a rainbow sprinkle funfetti cake.
How to Make a Rainbow Sprinkle Cake
This lesson begins where your cake and buttercream recipes stop. In other words, bake and cool your cakes, and make your buttercream. Now we'll pick up from there. Here are some recipes to work from:
- This is my recipe for Swiss buttercream (preferred, as it will not develop a skin once it's been exposed to air and has a great flavor). Here is my recipe for vanilla frosting, if you want to keep things simple.
- This is my recipe for a really good buttermilk vanilla birthday cake, adapted from Queen of Cake Maida Heatter. I have also put the recipes for buttercream and the birthday sprinkle cake at the end of this post.

Making a Funfetti Sprinkle Cake: First Steps
The first step in decorating a sprinkle cake — other than to bake the cake, of course — is to layer and coat it with buttercream.
To do this, read this article: How to Frost and Decorate a Cake. This will take you through everything up to where the cake is layered with buttercream and the sides and top are, too.
Here's the quick Cliffs Notes version, though:

- First, make sure you have the right equipment: a cake smoother or comb; small and medium offset spatulas; cardboard cake rounds in the size of your cake pans; a cake turntable, such as this Ateco heavy-duty one (which pros use) or this less-expensive option; and, a long, serrated knife, like a bread knife.
- Slice the domed tops off the cake layers, and layer up with buttercream. Use the back of your large offset spatula to spread the frosting back and forth from the center, going just to the edge of the cake. Rotate the cake as you go. Add the second cake layer on top of the first, but place itupside-down on the buttercream, so that the bottom of the cake is on top. This creates a perfectly flat, relatively crumb-free top to your cake.
- Buttercream the sides and top of the cake using your offset spatulas and straight-edge cake smoother.
- Chill for at least 15 minutes, until the buttercream feels firm.

Sprinkle Cake Next Steps: Sprinkle the Sides
Ok. So you have your delicious buttercream-covered cake chilling in the fridge long enough to make the buttercream firm, but not so long that the cake itself gets cold. (Cold cake does not taste as good.) Now let's get into how to make the sprinkle cake.
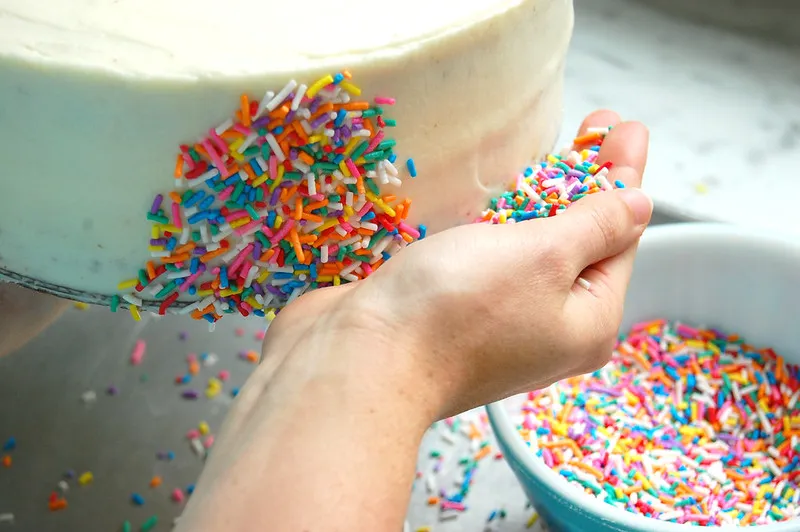
1. Set up your sprinkle station. Put a clean, lined sheet pan on the countertop. This will catch the falling sprinkles. Fill a small bowl with about 1 1/2 cups of sprinkles. You may use less, but you'll need extra.

2. Take the chilled cake and balance it gently in your non-dominant hand. Using your other hand, gather a handful of sprinkles and gently press them into the side of the cake, working from the base of the cake to the top edge, opening your palm as you go. Stop at the edge and don't "round the corner" onto the top of the cake. You want to keep those side edges sharp. Rotate the cake in your hand and repeat, going all the way around.
Gently pressing the sprinkles onto the cake is the reason the buttercream should be slightly firm. If the buttercream was very soft, you could end up with lots of dents in the cake. Firm buttercream keeps the straight sides and corners intact.
Rainbow Sprinkle Cake Final Steps: Cover the Top and Eat
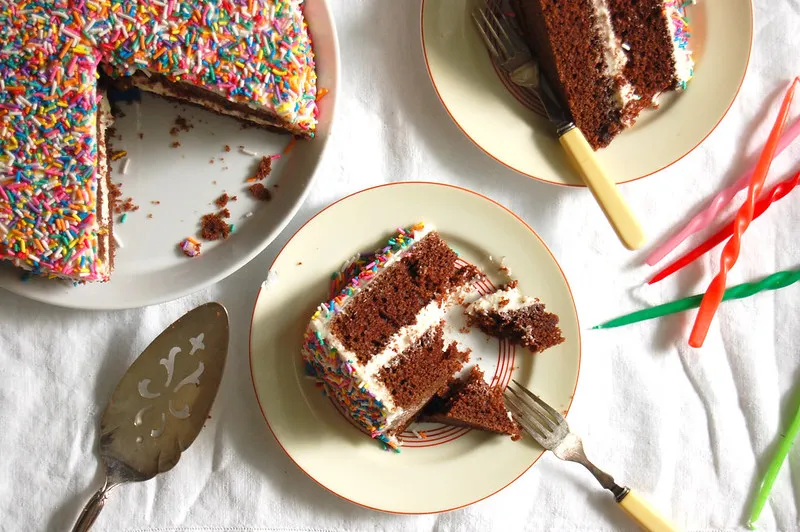
3. Now, place the cake in the sheet pan. Gather another large handful of rainbow sprinkles and pour a mound into a wide center of the cake. Use your hand to gently spread sprinkles over the remaining surface of the cake. Pour and spread more sprinkles as necessary to cover the bare spots.
You may not even want to cover the top of the cake, like if you are going to write "Happy Birthday" on top. But I can't help but love a cake fully covered in sprinkles.

4. Take a look at the top and sides. Any bare spots? Gently add some more sprinkles.
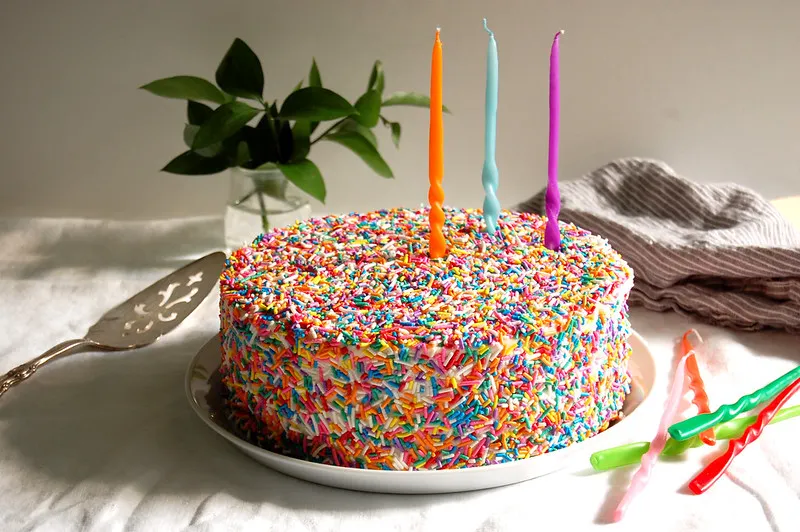
That's it! Congratulations! You have your own rainbow sprinkle funfetti cake. Don't worry if it does not look perfect. It looks better than you think, and cake decorating can be tricky. And as always, feel free to reach out with any questions.
If you like this rainbow sprinkle funfetti cake, you'll also like:
- How to Fill and Frost a Layer Cake
- Recipe: Vanilla Birthday Sprinkle Cake
- How to Make a Chocolate Drip Cake
- The Commissary's Famous Carrot Cake
Rainbow Sprinkle Funfetti Cake
A perfect buttermilk cake layered with rainbow sprinkles for a sweet celebration. Plus: A step-by-step lesson on decorating a rainbow sprinkle cake.
Prep Time 20 mins
Cook Time 35 mins
Course: Dessert
Keywords:: birthday cake, buttermilk, dessert, layer cake, recipe, sprinkles cake, vanilla
- 3 cups all-purpose flour
- 1/2 teaspoon baking powder
- 1/2 teaspoon baking soda
- 3/4 teaspoon salt
- 8 ounces (2 sticks) unsalted butter, softened
- 2 teaspoons pure vanilla extract
- 2 cups sugar
- 4 eggs
- 1 cup buttermilk
- zest of one lemon or orange (optional)
- 1/3 cup rainbow sprinkles (optional)
-
Preheat the oven to 325°F and grease two 8" cake pans or one 10" loaf pan.
-
Sift the flour, baking powder, baking soda, and salt together in one bowl and set aside.
PRO TIP: Don't feel like sifting? (For the record, I avoid it whenever possible.) Do a quick, "fake" sift by stirring the dry ingredients together for a minute with a whisk. It won't be quite as fluffy and powdery, but it will work fine in a cake like this -- though it is best to do a full sift for extra-light baked goods like soufflés and sponge cakes.
-
In the bowl of an electric mixer, cream the butter and sugar on medium until light and fluffy. Scrape the bowl once during this process to make sure everything is smooth and getting the attention it deserves. Scrape again.
-
With the mixer on low, add the eggs, vanilla, and lemon zest (if using). Once it starts to incorporate, kick the mixer up to medium again, and beat until it is lightened and fluffy, about one minute. Scrape the bowl and briefly mix again.
-
On low speed, alternately add the sifted dry ingredients in three additions and the buttermilk in two: dry, wet, dry, wet, dry. When everything is just incorporated, remove the bowl from the mixer. Scrape the bowl as necessary, and fold in the sprinkles by hand using a spatula.
-
Pour the batter into the cake pans or loaf pan. Use the back of the spatula to smooth the batter evenly, and bake. Two 8" round pans will take about 30-35 minutes. One loaf pan will take around 1 1/2 hours.
PRO TIP: Your cake is done when a cake tester or skewer inserted into the middle comes out clean, and the top feels firm but not hard, like a sponge. You may also notice the edges pulling away from the pan.
-
Cool in the pans for about 20 minutes. When the pans are cool enough to handle, run an offset spatula or a knife around the rim, and turn cakes out, onto a cooling rack. Let fully cool.
PRO TIP: This cake can be made a day or two in advance, and I recommend doing so. Cake always tastes better the next day.
Reader Interactions
Decorating A Cake With Sprinkles
Source: https://unpeeledjournal.com/how-to-decorate-make-a-sprinkle-cake/
Posted by: mentzerdriers.blogspot.com
0 Response to "Decorating A Cake With Sprinkles"
Post a Comment